

Appointments Help Guide
The Appointments feature lets your chatbot help visitors book a meeting (demo, consultation, appointment) and saves those requests in your Appointment Records. You can connect a scheduling provider (Calendly) or a calendar (Google/Microsoft) so the bot can offer available times.
Where to find it:
My Chatbots → (Select a Chatbot) → Appointments
What Appointments does
Allows your chatbot to start a booking flow when users ask to book
Connects to a scheduling/calendar provider to support time-slot selection
Saves bookings in Appointment Records so your team can follow up
Page overview (what each part means)
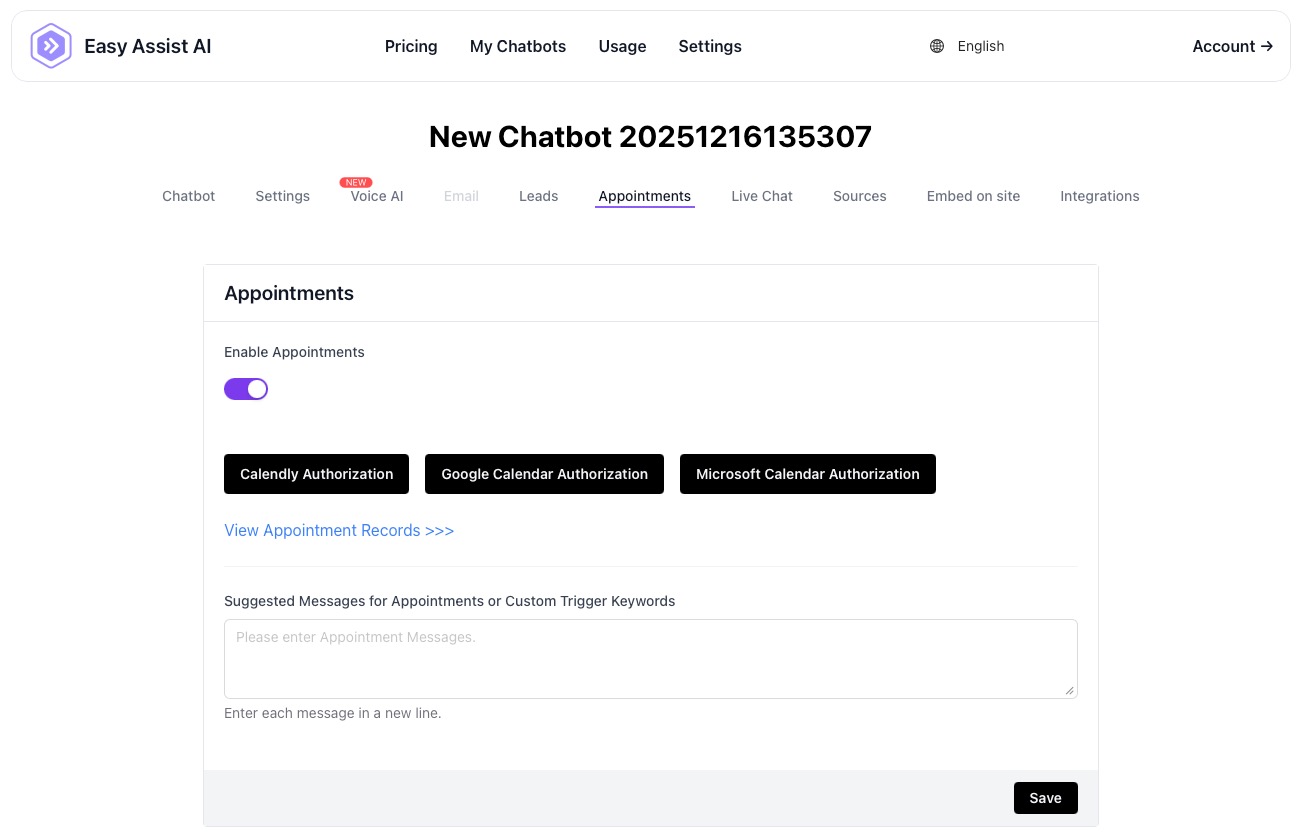
1) Enable Appointments (toggle)
ON: The bot can detect booking intent and start the appointment flow.
OFF: Booking is disabled.
Tip: Turn this ON before testing the booking flow on your website.
2) Authorization Buttons (Connect a provider)
You can connect one scheduling provider/calendar to power appointment booking:
Calendly Authorization
Connects your chatbot to Calendly so users can book via your Calendly setup.
Use this if:
You already manage availability, buffers, and event types in Calendly
You want the simplest setup (Calendly handles scheduling rules)
Google Calendar Authorization
Connects your chatbot to Google Calendar to support availability-based booking.
Use this if:
You schedule in Google Calendar
You want bookings based on calendar availability
Microsoft Calendar Authorization
Connects your chatbot to Microsoft calendar (e.g., Outlook/Office 365) to support booking.
Use this if:
Your team schedules in Outlook/Office 365
You want bookings based on Microsoft calendar availability
Best practice
Choose the platform you actually use for scheduling daily (Calendly OR Google OR Microsoft).
If you switch platforms later, re-authorize the new one and test again.
3) View Appointment Records
Click “View Appointment Records >>>” to see the bookings your chatbot has captured (who booked and when).
This is your “log” of appointment submissions.
4) Suggested Messages / Custom Trigger Keywords (textbox)
This tells the chatbot what user phrases should trigger the appointment flow.
Enter one trigger phrase per line
Keep phrases short and natural
Good examples (copy/paste list):
Book a demo
Book an appointment
Schedule a call
Talk to sales
Consultation
Book now
Set a meeting
Meet with your team
Can I book?
I want to schedule
Tip: Add both “formal” and “casual” phrases. Users don’t always type the same wording.
5) Save
Click Save after any changes (toggle, triggers, provider authorization).
If you don’t save, your triggers/settings may not apply.
Recommended setup (fast + reliable)
Turn Enable Appointments ON
Click one authorization button (Calendly OR Google OR Microsoft) and complete login/permission steps
Add at least 5–10 trigger phrases (one per line)
Click Save
Test on your chatbot (embedded site) by typing: “Book a demo” or “Schedule a call”
Common workflows
A) You already use Calendly
Authorize Calendly
Add triggers like “Book a demo” / “Schedule a call”
Save → test booking in chat
B) You schedule directly in Google Calendar
Authorize Google Calendar
Add triggers
Save → test booking in chat
C) Your team uses Outlook/Microsoft 365
Authorize Microsoft Calendar
Add triggers
Save → test booking in chat
Troubleshooting
Booking doesn’t trigger in chat
Confirm Enable Appointments is ON
Add more trigger phrases (one per line)
Click Save
Use simple phrases like “book”, “schedule”, “appointment”, “demo”
Authorization button worked, but booking still doesn’t show
Re-check that you clicked Save
Try logging out/in and authorizing again
If you connected multiple providers, pick one and stick to it (avoid conflicts)
No appointment records are appearing
Confirm users completed the booking flow
Test it yourself using the triggers
Check that the chatbot is properly embedded on your site and receiving traffic
Best practices (conversion + fewer no-shows)
Use a clear primary trigger like “Book a demo”
Add “high-intent” triggers: pricing, quote, consultation, call
Follow up quickly using Appointment Records (same-day response boosts conversion)
Privacy reminder
Appointments can include personal information (name, email, phone). Limit access to authorized staff and treat exports/records securely.
Settings explained
1) Enable Appointments (toggle)
ON: The chatbot can offer booking and create appointment records.
OFF: Booking is disabled (no slots shown).
2) Google Calendar connection
Appointments sync with your connected Google account.
Google Calendar List (dropdown)
Choose which calendar to use for availability checks (example: “EasyAssistAI”, “Work”, “Bookings”).
Tip: Use a dedicated “Bookings” calendar for cleaner scheduling.
Cancel Google Calendar Authorize (button)
Disconnects Google Calendar authorization.
Use this if you want to switch accounts or re-authenticate.
3) Duration (dropdown)
Sets the length of each appointment slot (e.g., 15, 30, 45, 60 minutes).
Best practice
Demos/consultations: 30–45 min
Quick inquiries: 15–30 min
4) Hourly system (dropdown)
Choose how times display:
12 Hours (e.g., 3:30 PM)
24 Hours (e.g., 15:30)
5) Available Time (weekly schedule)
This defines the working hours your bot can offer.
Each day has a checkbox to enable that day.
Time ranges (e.g.,
10:30 – 11:30) define when appointments may be booked.“+” (plus) adds an additional time range for that day (useful for breaks).
“x” removes a time range.
Example schedule
Wed:
10:30–11:30,13:30–14:30,15:30–16:30Sat:
10:00–18:00
How availability works
The bot only offers slots inside your Available Time windows
It should also avoid times already marked busy in your selected Google Calendar
6) View Appointment Records
Click View Appointment Records >>> to see saved bookings (who booked, what they requested, and when it was created).
7) Suggested Messages / Custom Trigger Keywords
This tells the chatbot what phrases should trigger the booking flow.
Enter one trigger per line
Keep triggers short and common
Good examples
Book a demoSchedule a callBook an appointmentTalk to salesConsultation
Tip: Add both “formal” and “casual” phrases users actually type.
8) Save
Always click Save after changes—availability, calendar selection, and triggers won’t apply until saved.
Best practices (to prevent missed bookings)
Use a dedicated calendar (e.g., Bookings) and keep it clean
Add breaks using multiple time ranges (morning + afternoon)
Keep duration realistic (don’t over-tighten slots)
Add 5–10 trigger phrases so users naturally hit the booking flow
Test from your website chat: type “book a demo” and confirm slots appear
Troubleshooting
No slots are showing
Confirm Enable Appointments is ON
Confirm you selected a Google Calendar List
Ensure at least one day has Available Time enabled and saved
Widen your available windows (for testing)
Check your calendar isn’t fully blocked by existing events
Slots show but bookings conflict
Make sure you chose the correct calendar (the one that contains your real busy events)
Consider using one calendar strictly for booking conflicts (and ensure all busy events are there)
Times look off (timezone issues)
Your availability typically follows your Google Calendar timezone.
Verify the timezone in Google Calendar settings and your device/browser.
Triggers aren’t working
Add more trigger phrases (one per line)
Make sure you clicked Save
Use simple phrases users will type (“book”, “appointment”, “schedule”)
Privacy reminder
Appointment records can include personal information (name, email, phone, message). Limit access to authorized staff and avoid sharing exports publicly.